Decking
On the decking you will find:
- A dining table and eight chairs
- Two sun loungers
- A gas barbecue (this may be stored in the lower level storage cupboard)
- A wood-fired oven and food preparation area
- A storage box containing cushions
For information on the wood-fired oven see FIRE AND SAFETY NOTICE.
Chairs and sun loungers
The chairs and sun loungers are supplied with cushions which you will find in the large storage box on the decking. Please return the covers to the storage box after use and in the event of rain.
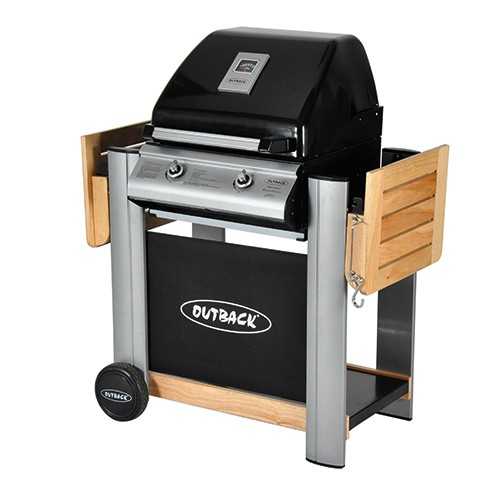
Barbecue
A gas barbecue is supplied together with a gas cylinder which is similar to the following:
Selecting a Location
We recommend that you place the barbecue against the wall to the left of the wood-fired oven when cooking. This barbecue is for outdoor use only and should be placed in a well-ventilated area. Take care to ensure that it is not placed UNDER any combustible surface. The sides of the barbecue should NEVER be closer than 1 metre from any combustible surface. Keep this barbecue away from any flammable materials!
Precautions
Do not obstruct any ventilation openings in the barbecue body. Position the gas supply bottle on level ground next to the barbecue and safely away from any source of heat. Should you need to change the gas bottle, confirm that the barbecue is switched off, and that there are no sources of ignition (cigarettes, open flame, sparks, etc.) near before proceeding. Inspect the gas hose to ensure it is free of any twisting or tension. The hose should hang freely with no bends, folds, or kinks that could obstruct free flow of gas. Apart from the connection point, no part of the hose should touch any hot barbecue parts. Always inspect the hose for cuts, cracks, or excessive wear before use. If the hose is damaged, it must be replaced with hose suitable for use with LPG and meet the national standards for the country of use.
Fixing the Regulator to the Gas Bottle
Confirm all barbecue control knobs are in the off position. Connect the regulator to the gas bottle by placing the regulator over the outlet at the top of the gas cylinder, pressing down firmly (you should hear it ‘click’ into place) and then turning the black knob clockwise through a quarter of a turn.
When you are not using the barbecue be sure to turn the black knob through a quarter turn anti-clockwise in order to turn off the gas supply.
To disconnect the regulator from the gas bottle, turn the black know anti-clockwise through a quarter of a turn and then press hard on the black knob. The regulator will be released and will disconnect from the bottle.
Preparation Before Cooking
On the underside of the barbecue cooking area you will find a drip tray for collecting fat and other liquids that are released during cooking. Line the drip tray with aluminium foil and fill the drip tray with dry sand. This will absorb excess cooking fat and make cleaning easier. To prevent foods from sticking to the porcelain, please use a long handled brush to apply a light coat of cooking or vegetable oil before each barbecuing session.
Lighting the Barbecue Using the Integrated Ignition System
- Open the roasting hood of your barbecue before lighting.
- Open the gas control valve on the gas bottle or regulator.
- Push the control knob of the burner you wish to light and turn it anti-clockwise until you feel resistance to the turning. Pause 4 seconds, then continue turning the control knob until a click is heard and the burner is lit. If burner does not light, turn off the gas by pushing and holding in the control knob in at the “High” position and turning to “Off”. The lighting sequence can then be repeated 4-5 times until the burner is lit. Ignite any of the remaining burners in any order, as needed. Confirm each burner is alight before igniting another burner. If any burner fails to ignite after following above procedure, turn all the knobs to the off position. Close the gas valve on the gas bottle. Wait five minutes. Reattempt all of the above steps. If the barbecue still fails to light, please refer to the manual ignition instructions below.
- After ignition, turn the burners to the high position for 3-5 minutes in order to pre heat the barbecue. This should be done before each cooking session. When pre heating is complete, cooking can begin, taking extra care if burners are left in the high position.
Manual lighting instructions
- Insert lit match through the leftmost match-lighting hole on the underside of the control panel and place near leftmost burner porthole.
- Push and turn the leftmost control knob anti-clockwise to the high position.
- When the left burner is lit, turn the remaining burners on from left to right.
- Confirm that each burner is alight before turning on the next burner.
- If leftmost burner fails to light, contact your local dealer for assistance.
- After lighting, turn the burners to the high position for 3-5 minutes in order to pre heat the barbecue. This should be done before each cooking session. When pre heating is complete, cooking can begin, taking extra care if burners are left in the high position.
Grill Cooking
The burners heat the flame tamers beneath the grill that, in turn, heats the food. The natural juices produced during cooking fall onto the flame tamers and vaporise to form smoke. The smoke then rises and ‘bastes’ the food, giving it that unique barbecued flavour. When using your barbecue for grill cooking you may wish to place the hood in the closed position which will hold the heat in to aid cooking.
Griddle Plate Cooking
The burners heat the griddle plate directly, which then cooks the food on contact. Plates allow for the cooking of smaller items, such as seafood, which could fall through the spaces of a grill. They are also suitable for cooking items that require high temperature/short-duration cooking, such as vegetables and smaller cuts of fish. Similarly, it can be used in exactly the same way as a griddle in the kitchen, for searing steaks, cooking eggs, etc. Alternatively, it can be used for heating pans or keeping food warm.
Warming Rack
Warming racks are a convenient way to keep cooked food warm or to warm items such as bread rolls. Care should be taken to ensure that any items placed on the warming rack are cooked through and do not continue to cook and drip fat or meat juices, which could drip onto the lid and down the back of the barbecue.
Roasting Hood Cooking
The roasting hood gives the option of cooking with hood closed to form an ‘oven’ for roasting food, such as joints of meat, whole chickens, etc. When roasting, turn the burner directly under the food to the OFF position. Turn the other burner to a LOW to MEDIUM position and close the hood. Avoid lifting the hood unnecessarily as heat is lost every time the hood is opened. Use the temperature gauge to check the heat of the barbecue. DO NOT ALLOW THE BARBECUE TO OVERHEAT.
Flare-Up Control
Flare-ups occur when meat is barbecued, and its fat and juices fall upon the hot flame tamers. Smoke helps give food its barbecued flavour, but avoid excessive flare-up to prevent food being burned. To control flareup, it is advisable to trim away excess fat from meat and poultry before grilling. To reduce flare-ups, the burners should be turned down to the low setting. Flare–ups can be extinguished by applying baking soda or salt directly onto the flame tamers. Always protect your hands when handling anything near the cooking surface of the barbecue. Flare-ups occur more at the start of cooking, particularly with processed meat products, and it may be necessary to turn the burners down to their lowest setting to start with and then turning up at a later stage in the cooking process. The barbecue should also not be overloaded. Some parts of the cooking area are hotter than others. The hottest areas will be above the burners which will be where the flare ups will normally start. By leaving free space you can simply move the food away from the flare up to a cooler area until the flare up has subsided. If a fat fire should occur in the drip tray, turn all knobs to the off position, turn off the gas at the bottle, and wait for the fire to go out. Do not pull out the drip tray or douse with water.
End of Cooking Session
After each cooking session, turn the barbecue burners to the “high” position and burn for 5 minutes. This procedure will burn off cooking residue, thus making cleaning easier. Make sure the hood or lid is open during this process.
Turning Off The Barbecue
When you have finished using the barbecue, turn all the control valves fully clockwise to the “Off” position. To do this, push and hold in the control knob at the “High” position and turn to “Off”. The gas must then be turned off at the bottle by turning the black knob anti-clockwise through one quarter turn.